 English
 Dansk
Dansk Deutsch
 English
 Español
 Français
 Hrvatski
 Italiano
 Magyar
 Nederlands
 Norsk
Norsk Polski
 Română
 Slovenský
 Slovenščina
 Suomalainen
 Svenska
 Česky
Česky Ελληνική
 Български
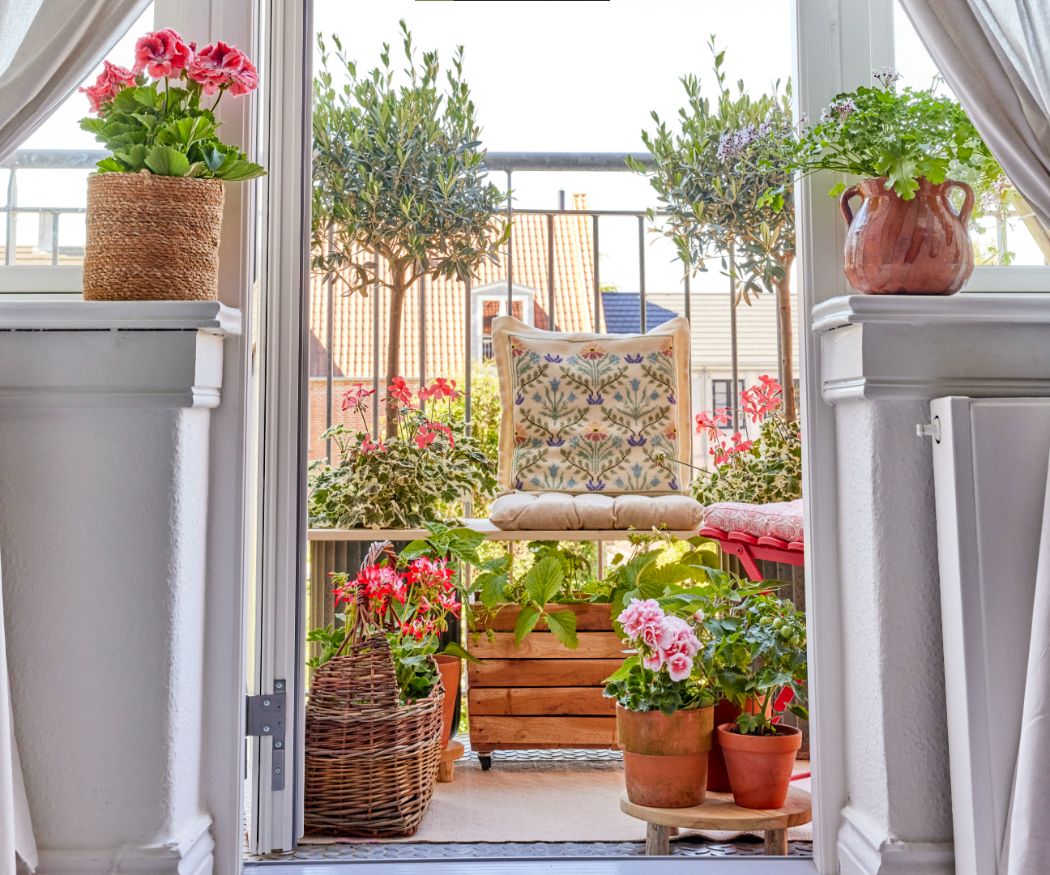
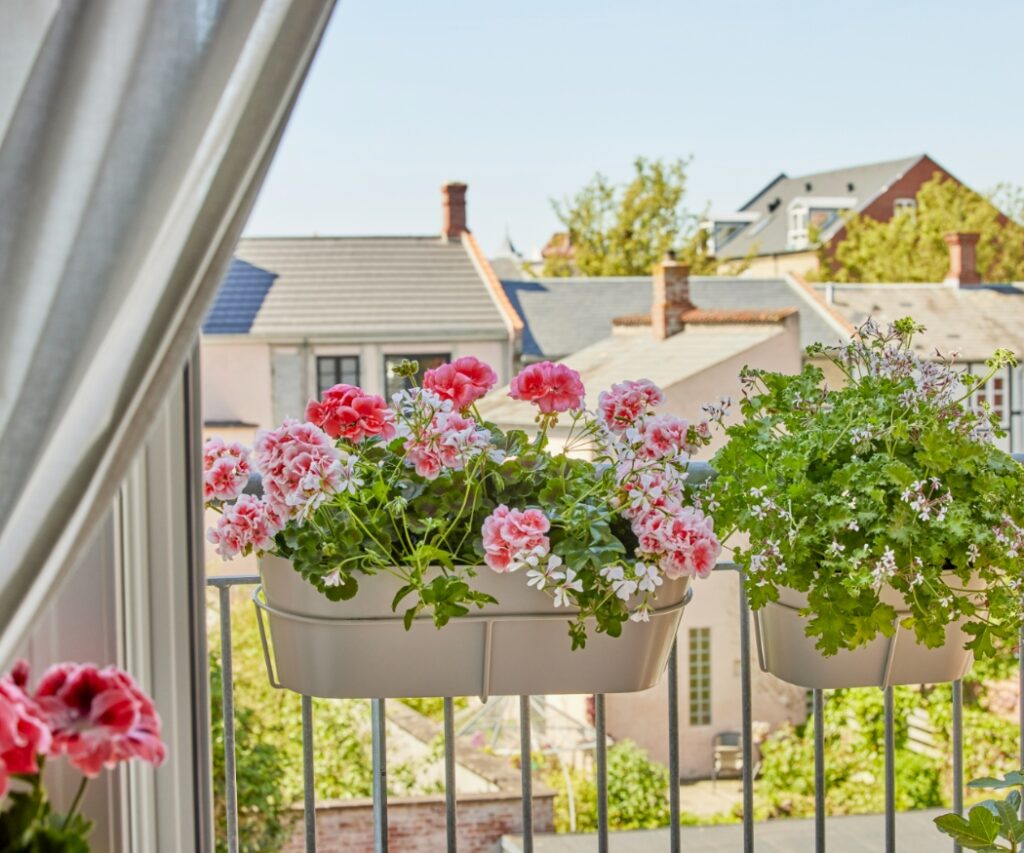
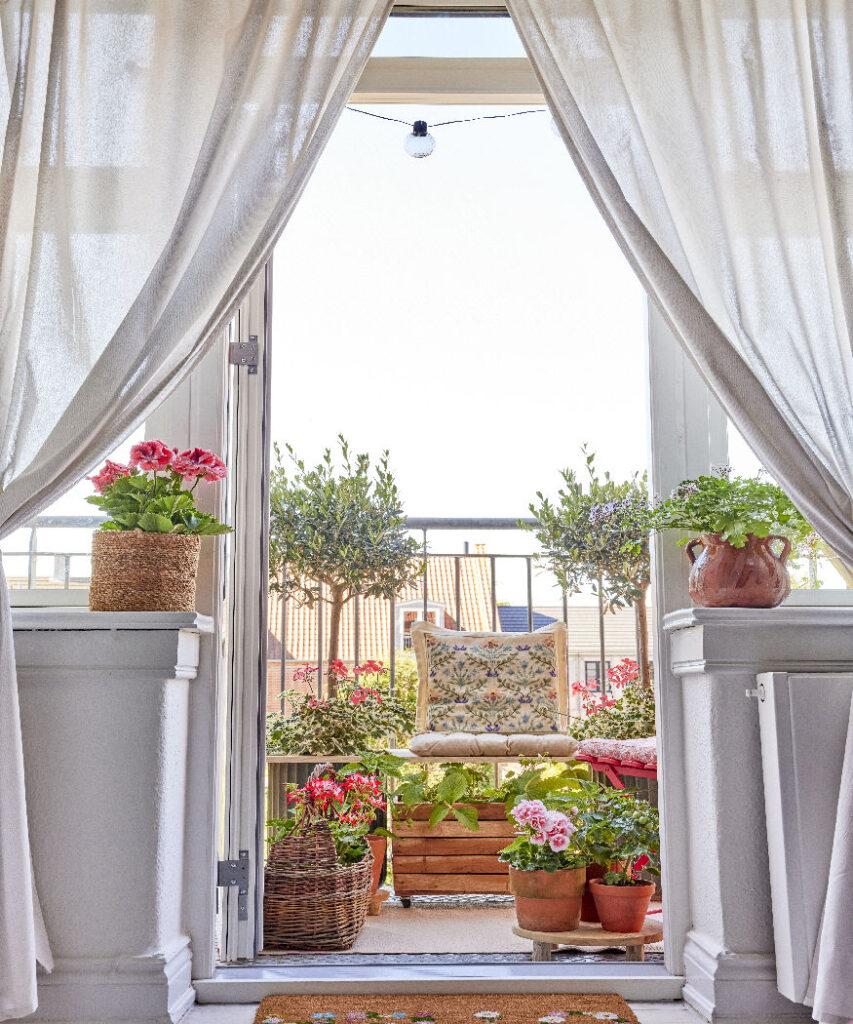
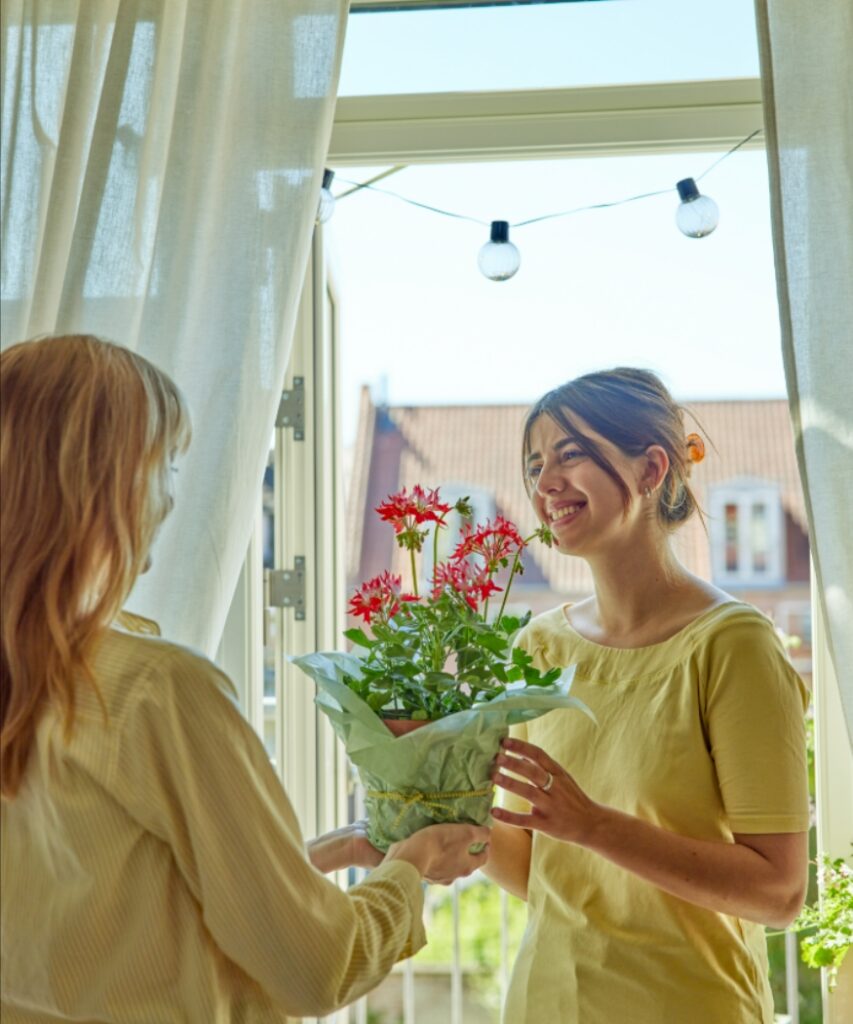
You open the door to your little balcony and there it is; a narrow strip that’s your window on the world. A space full of potential – and yet something’s missing. A bare metal floor, a simple railing – nice, but no soul. You’d much rather be sitting among blooming summer flowers, coffee in hand and that indescribable feeling of being on holiday.
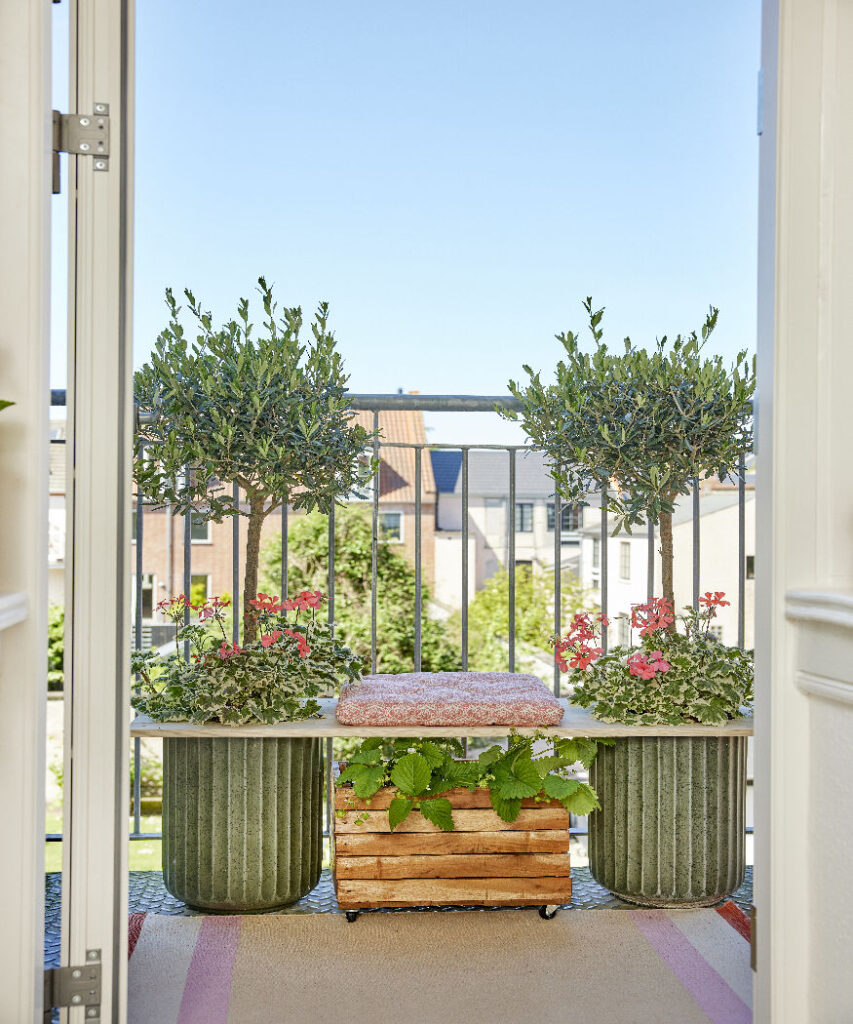
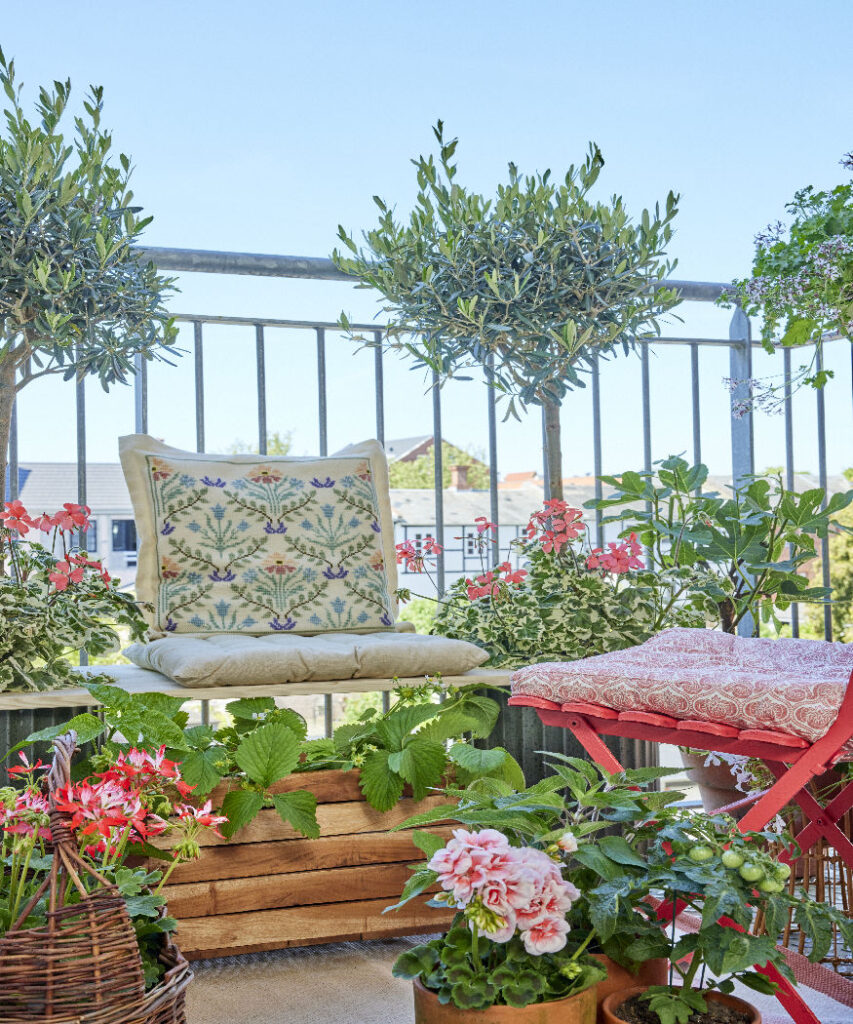
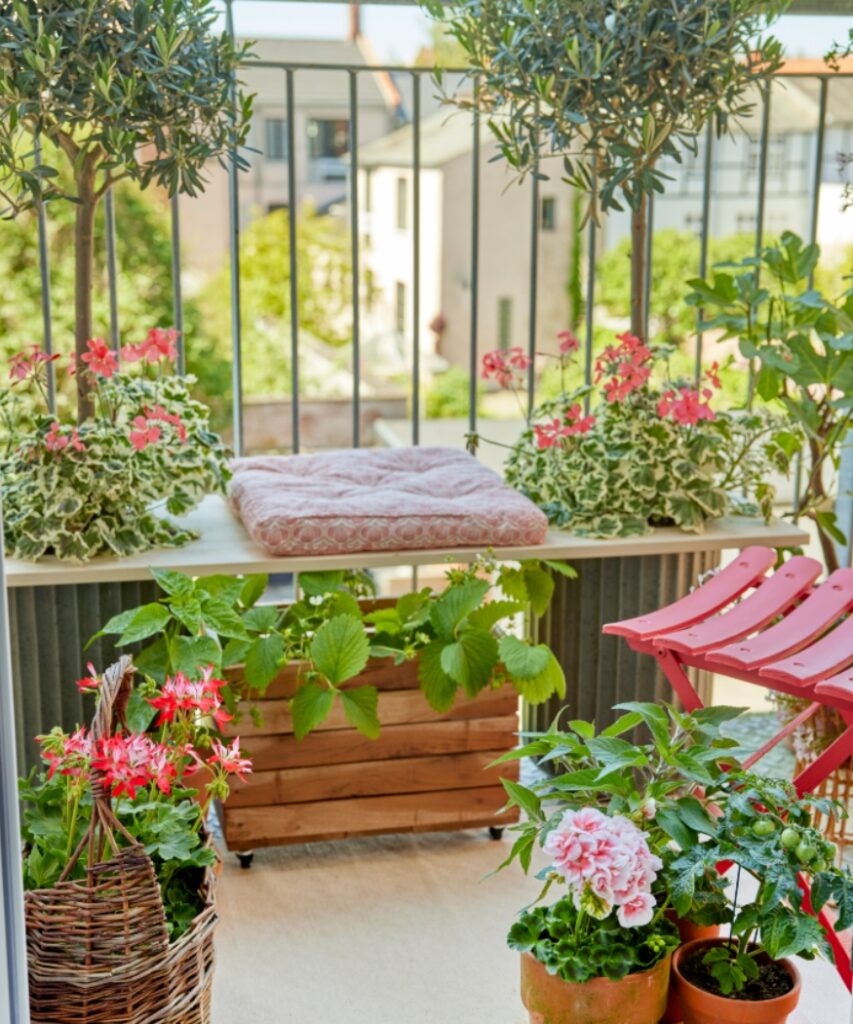
A homemade bench made from planted tubs makes this a reality; a seating area and garden in one – perfect for any mini balcony. A Mediterranean dream in the middle of the city – even in the smallest of spaces. Looking for furniture ideas, other than a balcony set for your small, narrow balcony? You’ll love this DIY bench!
Table of contents
- Materials for your DIY mini-balcony bench
- Quick guide for expert makers – The condensed version
- Step-by-step instructions for beginners
- Decoration and care tips
- Geraniums: the stars of your homemade bench
- Expert knowledge: FAQs
Materials for your DIY mini-balcony bench
For the bench:
• Wooden board, minimum dimensions, 120cm x 40cm x 3cm
• Recommendation: 3-layer cross-ply board (known as 3-ply) in larch or Douglas fir
• Primer, wood stain or clear varnish
• Tools: Jigsaw with fine wood saw blade, cordless screwdriver with 10mm wood drill bit, 120 and 240 grit sandpaper, folding ruler, pencil, nail, hammer, string, paintbrush or roller
For the planters:
• 2 sturdy containers, approx 40cm high
• Expanded clay or gravel for drainage
• High quality balcony compost
• Slow-release fertiliser
Planting:
• 2 olive trees
• 3-4 Geraniums (e.g. scented and ornamental leaf geraniums or other special varieties)
• Optional: strawberry plants, balcony tomatoes, fig tree
For decoration:
• Soft cushions and waterproof seat pads
• Baskets, planters, balcony boxes
• Optional: LED lights
Getting started – The condensed version
Got everything you need and ready to get started? Here’s a condensed process for experienced makers:
- Prepare the wood
Measure the holes for the containers, cut them out with the jigsaw and sand the edges. - Treat the wood
Wipe the board, prime and seal with waterproof varnish. - Prepare the containers
Add a drainage layer, then compost, mixed with slow-release fertiliser. - Assemble
Position the planters, place the wooden board on top, plant the plants and water. - Finishing touches (optional)
Add the cushions, planters and LED lights.
Detailed step-by-step instructions: Building furniture for small balconies
First time building furniture? This detailed step-by-step guide shows you how to build your own practical piece for your mini-balcony.
1. Prepare the wood
First, measure the top diameter (widest point) of the containers with a folding ruler and make a note of the number. Subtract 10cm from this number to get the diameter of the holes. The holes need to be smaller than the containers as you don’t want the board to slip down over them. Keep a note of the hole diameter as you will need it in Step 2.
2. Measure the holes correctly
The distance between the containers and the end of the board is crucial for stability. Here’s how to measure it:
- Distance to the edge of the board
Leave at least 8cm of wood between the end of the board and the edge of the hole. This will prevent the board from breaking under the load. - Determine the centre point of the hole
Take the hole diameter you calculated in Step 1 and divide it by 2. This is the radius you will work with. Mark the centrepoint of the hole by measuring a distance of 8cm from the end of the board plus the radius of the hole. Mark this point in the centre of the board’s width. For example, a radius of 15cm: 8cm + 15cm = 23cm from the end of the board is the hole’s centrepoint. - Draw a circle
Make a compass by hammering a nail into the centre mark and tying the string to it. Stretch the string to the same length as the radius and, holding the pencil at that point, run it round the centrepoint to draw the circle neatly.
3. Cut out recesses
- Drill the starting hole
Use the 10mm wood drill bit to drill the start holes (touching the inside edge of the circle). Note: The hole must be large enough to fit the tip of the jigsaw. - Saw out the circles
Place the jigsaw in the starting hole and cut along the line you drew. Repeat for the second side. Work smoothly to ensure clean edges. - Smooth edges
Smooth the cut edges with 120 grit sandpaper and remove any splinters or rough areas.
4. Sand the wood
If necessary, sand the entire surface of the board with 120 grit sandpaper. For an extra smooth finish, sand once more with 240 grit sandpaper. Pay particular attention to the edges of the recesses. Tip: Always sand in the direction of the wood grain to avoid scratches!
5. Prime and varnish the wood
• Thoroughly clean the wood to remove dust and dirt.
• Apply a suitable wood primer to prepare the surface for the varnish and increase its durability.
• Be sure to prime the cut edges of the circles as well – they need extra protection.
• Allow the primer to dry completely, according to the manufacturer’s instructions.
• Then apply the waterproof varnish (our preference) with a brush (our preference) or roller. Carefully cover the cut edges of the circles – this is where the wood is most sensitive to moisture.
• Allow the varnish to dry completely, according to the manufacturer’s instructions.
• Apply a second coat of varnish: the first layer will penetrate the wood and provide basic protection. The second coat enhances the protection and ensures an even finish.
6. Prepare the containers
• Place the drainage layer in the containers. Add 5-10cm of gravel or expanded clay to the bottom of the each one to prevent waterlogging.
• Fill to about 10cm below the rim with high quality balcony plant compost mixed with slow-release fertiliser, according to the package instructions.
7. Place the seat board
• Place the prepared planters in the desired position on your balcony.
• Place the finished wooden board on top of the planters so the cut-outs fit perfectly over them.
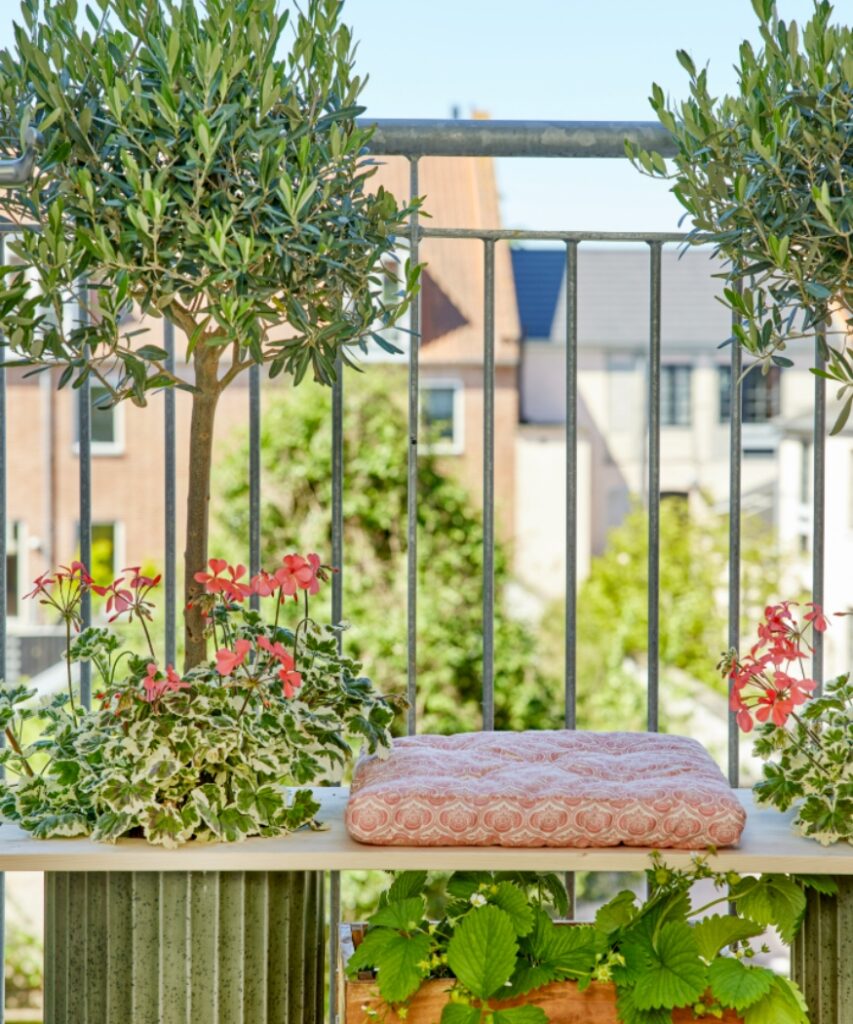
8. Add plants
• Make a hole in the centre of each container and plant an olive tree in each one.
• Top up with compost around the roots and press down gently.
• Plant the geraniums around the edge of the pot and press down the root balls as well.
• After planting, make sure you have left a gap of a few cms between the top of the container and the top of the compost, as a watering rim.
• Water well.
Fantastic! Now you have a piece of furniture for your small balcony that’s not only practical, but also beautifully planted.
Geranium planting made easy
The perfect conditions in a window box are the basis for a summer full of flowers. Here’s how to plant up window boxes with geraniums like a pro. Step by step. With a shopping list. And there’s plenty of background information too. Read on, get started and enjoy!
Decoration and care tips
Your homemade bench is now complete and ready to add the finishing touches to your mini balcony. A few decorative pieces and the right care will make it a real highlight. Best of all, you can adapt this space-saving alternative to suit your style just like a normal bench.
Enhance the seat
Soft cushions or waterproof seat pads not only make your bench comfortable but also add a splash of colour. Choose patterns or shades that work with the colourful geraniums – pick vibrant hues such as red or pink, or soft earthy tones for a Mediterranean look. A cosy blanket tucked away in a basket will keep you warm in the shade on cooler evenings.
Atmospheric lighting
A string of LED lights creates the ultimate evening mood. Attach them to the railings, for example, and transform your balcony into a magical little retreat, perfect for relaxing summer evenings.
Edible displays for food lovers
Use the space under the bench for small baskets or planters of strawberries, balcony tomatoes or herbs. Not only do they look good, they also make a tempting snack. Herbs such as basil or thyme add a Mediterranean feel to your balcony and are great for use in the kitchen! If you’re not on the balcony, bring the plants out from under the bench and put them in the light to help them thrive.
Geranium and olive tree care
To keep your plants healthy for a long while, they only need a little attention. Geraniums love sunlight and should be placed in a bright spot if possible. Water regularly, but don’t let them get too wet – a good drainage layer will help. Remove faded flowers and wilted leaves regularly to encourage abundant flowering. Olive trees are equally easy to look after but should not be pruned. Like geraniums, they can be overwintered at between 5 and 10°C. Here’s a short guide to overwintering geraniums. Click on the BONUS link in the article to find out more.
With these little details, your homemade bench will not only be a centrepiece, but also your new favourite spot. With a good book, a cup of coffee or a chat with friends, this balcony is the perfect place to enjoy life outdoors!
Geraniums: The stars of your homemade bench
Geraniums are hardy and easy-care classics – and they can quickly transform a space, adding a touch of holiday cheer to any balcony, no matter how small. Available in a wide variety of colours, shapes and scents, they are perfect for both modern and traditional designs and will make your homemade furniture a real showstopper.
Variety and adaptability
The range of geraniums available is impressive: from vibrant colours such as red, pink and purple to delicate white or pastel shades and multi-coloured specimens, there’s something to suit every taste. Especially appealing are the ornamental leaf geraniums, with their patterned or serrated leaves, and the scented varieties, with their unexpected aromas of lemon, rose and mint.
Their different growth habits allow you to create a specific look and feel. Trailing geraniums create a lush, flowing effect at the edge of containers, while upright zonal varieties add structure and volume in the centre. There are so many special varieties to choose from!
Long lasting and easy to maintain
Geraniums are ideal for the busy balcony gardener as they require very little maintenance. They love a sunny spot and, with regular care, will return the favour with lush flowers that last from spring to autumn.
Geranium care
Geraniums are a godsend for anyone who doesn’t yet have green fingers. They are forgiving of care mistakes and thrive almost on their own. Read our article ‘7 golden rules for geranium care’ to find out how you can quickly bring visible success and lots of colour to your balcony.
Creative design ideas
Geraniums offer endless possibilities for creative combinations. It’s not a question of space.
Mediterranean feel: Combine red or white geraniums with olive and fig trees.
Fruity indulgence: Plant fragrant geraniums with strawberries or herbs for a delicious balcony.
Modern design: Go for a monochrome colour palette, such as just white geraniums, for a clean look. Light colours will make a small space look bigger and dark colours will make it look smaller.
A sustainability statement
Geraniums are also a sustainable choice thanks to their longevity and ease of care. By sourcing locally, you not only support local nurseries but also reduce the carbon footprint of your plants.
Get creative and design your own furniture for small, narrow balconies! Share your DIY balcony furniture ideas and results – we love hearing from you! Find us on Facebook, Pinterest, YouTube and Instagram.
Expert knowledge: FAQs
Why do you recommend larch or Douglas fir?
Larch and Douglas fir are weather resistant woods with low resin content. Inexpensive and readily available, they will look good for many years with minimal maintenance; ideal all-weather choices for outdoor DIY projects.
Why not another type of wood?
Pine and spruce are less suitable as they tend to release resin. For a more elegant look, you could use oak. However, oak is very heavy and can be quite expensive, if you want a larger board of good quality for outdoor use. Also, oak can only be worked to a high standard if good quality tools are used.
False acacia (Robinia pseudoacacia) is similar. It is also very hard, but expensive. Tropical woods such as teak or bangkirai (Shorea laevis) are highly weather resistant, but ecologically questionable if not sourced from a certified supplier. Beech and maple are beautiful woods but aren’t suitable for outdoor projects as they are quickly attacked by fungi if left unprotected outdoors.
Back to instructions
What kind of boards are suitable for outdoor use?
Three-layer cross-ply board (known as three-ply), phenolic resin coated plywood (known as phenolic ply), and solid wood planks made from weather-resistant wood species are all suitable for this purpose.
A three-ply board consists of three layers of wood glued together, with the middle layer placed at right angles to the other two layers. This makes the board strong, rigid and warp resistant. It’s ideal for outdoor use as it’s much less susceptible to warping (even with temperature changes) and moisture. We think it’s the best choice for your project! Strong, durable and perfect for outdoor use.
Solid wood planks are made from real solid wood. They look natural, are strong and durable. However, they are difficult to saw and drill and require regular maintenance (e.g. oiling).
There is also multiplex board. Like plywood, it is made up of several layers of wood veneer glued crosswise. Multiplex board always has five or more layers, whereas plywood only has three. This makes multiplex board very strong and durable, and its smooth surface means it is ideal for projects where a varnished finish is required. Only those marked ‘WBP’ (Weather- and boil-proof) are waterproof.
Phenolic ply boards are special multiplex boards protected from moisture by a phenolic resin coating. They are completely weatherproof and very strong. Unfortunately, they are not very decorative and are heavy and expensive.
Glue laminated timber panels (known as Glulam) are made from solid wood strips glued together. They are strong and relatively inexpensive. However, they are not ideal for outdoor use as they can swell and warp when exposed to moisture. Without proper protection, we don’t recommend them for your DIY project.
Back to instructions
What is the difference between wood stain, wood varnish and wood oil?
A stain is a thin liquid wood preservative that is absorbed into the wood and protects it from within, rather than forming a sealed layer on the surface. Stains allow the wood to breathe by allowing moisture to escape from the inside of the wood. They need to be reapplied regularly (every 2 to 4 years, depending on the weather).
Varnish forms an impermeable layer on the wood surface. It completely seals the wood and protects it from moisture, dirt and UV rays.
A wood oil penetrates deep into the wood, preserving it from the inside without forming a protective layer on the surface. It is easy to apply and maintain but provides limited weather protection and is not suitable for heavily weathered surfaces. It will need to be reapplied once or twice a year in outdoor areas.
Back to instructions
Which sandpaper grit for what?
Sandpaper comes in different grit sizes. The smaller the number, the coarser the grit. A medium grit of 120-180 is suitable for smoothing the edges after sawing. 240-400 grit sandpaper is used for final sanding before applying stain or varnish. As an occasional user, aluminium oxide sandpaper is only really needed for hardwoods such as oak or beech. Important: Always sand in the direction of the grain to avoid scratches. A sanding block will give a more even result.
Back to instructions
Sturdy containers – what to look out for
- Shape: Choose straight or, at most, slightly conical tubs (wider at the top than at the bottom) for stability. Avoid narrow or very tapered shapes as they tend to tip over.
- Height: A comfortable sitting height is around 50cm. Your bench should not be lower than 40cm.
- Diameter: A diameter of around 30-40cm is needed at the top to ensure the board sits securely and the bench is wide enough to sit on.
- Material: Heavy and frost-resistant materials, such as stoneware (also known as earthenware) are best. Stoneware is a special type of ceramic fired at high temperatures. It is very tough, resistant to frost, moisture and mechanical stress, and has a smooth, hard surface that is durable even when unglazed.
- Other: There must be a drainage hole in the base for excess water to run out. This will prevent waterlogging.