English
 Dansk
Dansk Deutsch
 English
 Español
 Français
 Hrvatski
 Italiano
 Magyar
 Nederlands
 Norsk
Norsk Polski
 Română
 Slovenský
 Slovenščina
 Suomalainen
 Svenska
 Česky
Česky Ελληνική
 Български
Do you have stacks of old flower pots at home that are too good to throw away, but don’t look their best any more? Then you’ve come to the right place. In this post, we’ll give you seven upcycling ideas to give old flower pots a new lease of life in no time. Don’t worry, you don’t have to be a crafting pro to make them. 😉 Let’s get started! Not much makes us happier than being creative with flowers. 😊 Upcycling old pots also has a lot of other advantages: You save money (if you already have the necessary materials). Convinced? Then see which of our seven DIY ideas you like best and get started right away! 😊
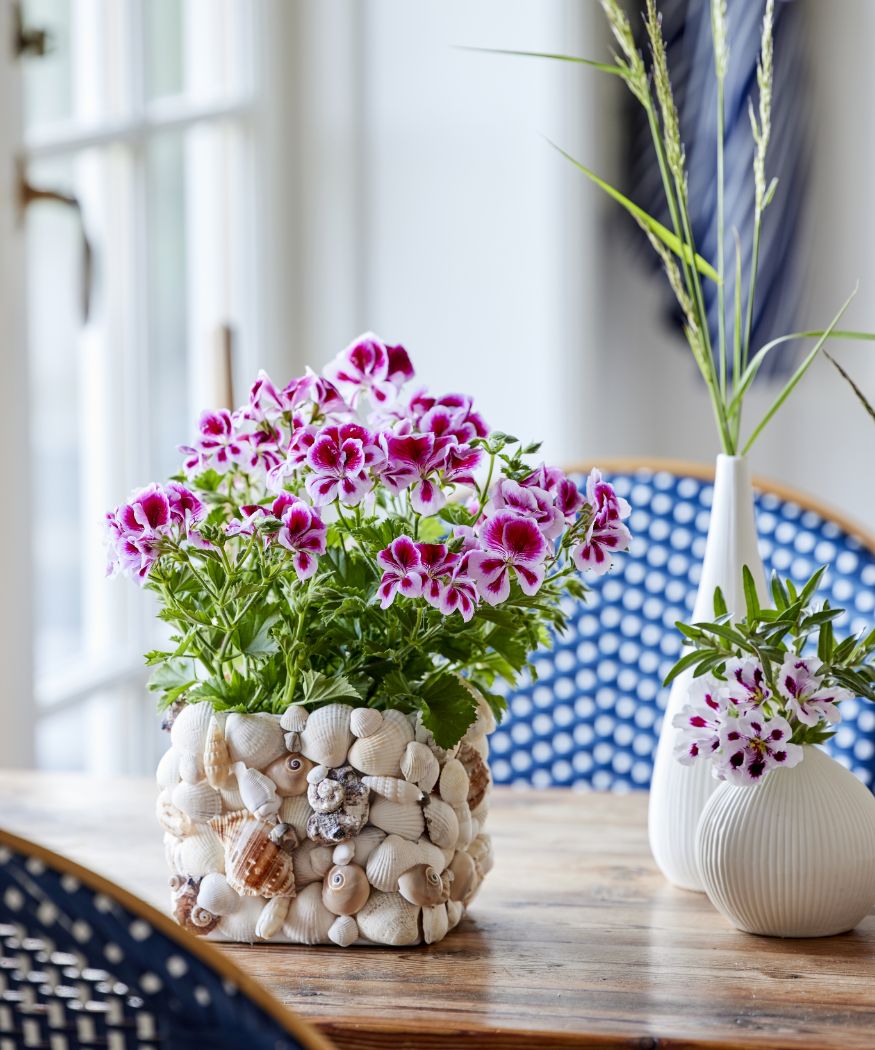
DIY idea 1: Geranium pot for beach lovers
Do you love the sea and the beach? Then this nautical eye-catcher is the perfect craft project for you! All you need is a simple, square pot, shells and snail shells, a hot glue gun, hot glue and a geranium.
It’s simple: clean the shells and snail shells thoroughly and glue them close together on the pot with hot glue. Put the geranium inside and that’s it!
Can’t get to the seaside to do your own shell collecting? You can also buy shells and snail shells. With a gorgeous noble geranium, this homemade shell pot is the ideal gift for beach lovers. 😊
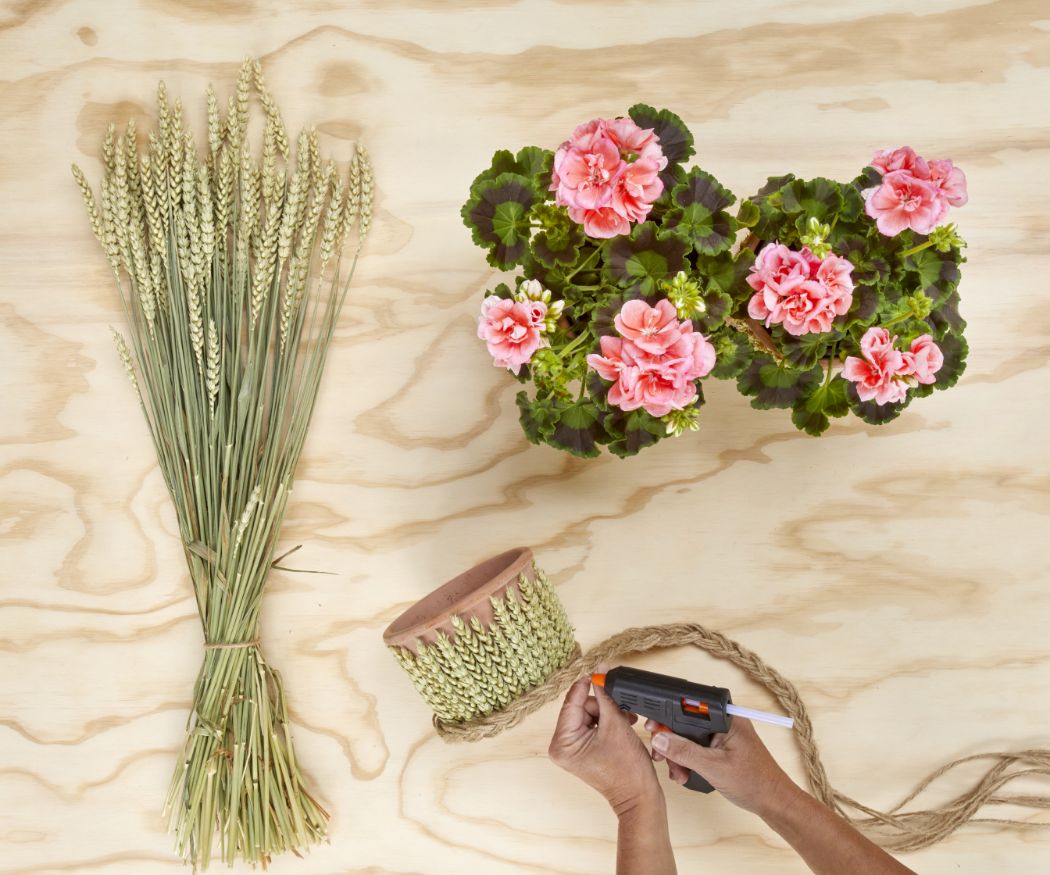
DIY idea 2: Geranium pot for countryside lovers
Do you love the country style? Then you’ll definitely love this DIY pot. You can make it yourself quickly and easily.
You will need a terracotta pot, a bunch of dried wheat (available at florists or craft stores), a hot glue gun, hot glue, scissors and jute twine.
Here’s how to do it: Cut the wheat and stick ears of wheat all around the terracotta pot, starting at the bottom.
These can be of different lengths to make it look more interesting. Measure the circumference of the bottom of the pot and multiply it by two.

Cut nine pieces of jute string of the same length and tie them all together at one end.
Take three strings in a bundle and make a plait from the three bundles of three. Place this around the bottom of the pot as a decorative border and fix it with hot glue.
Finally, put the geranium in the pot and place it on the table. Job done 😊! If you feel like it, you can also make matching napkin rings from woven jute twine.
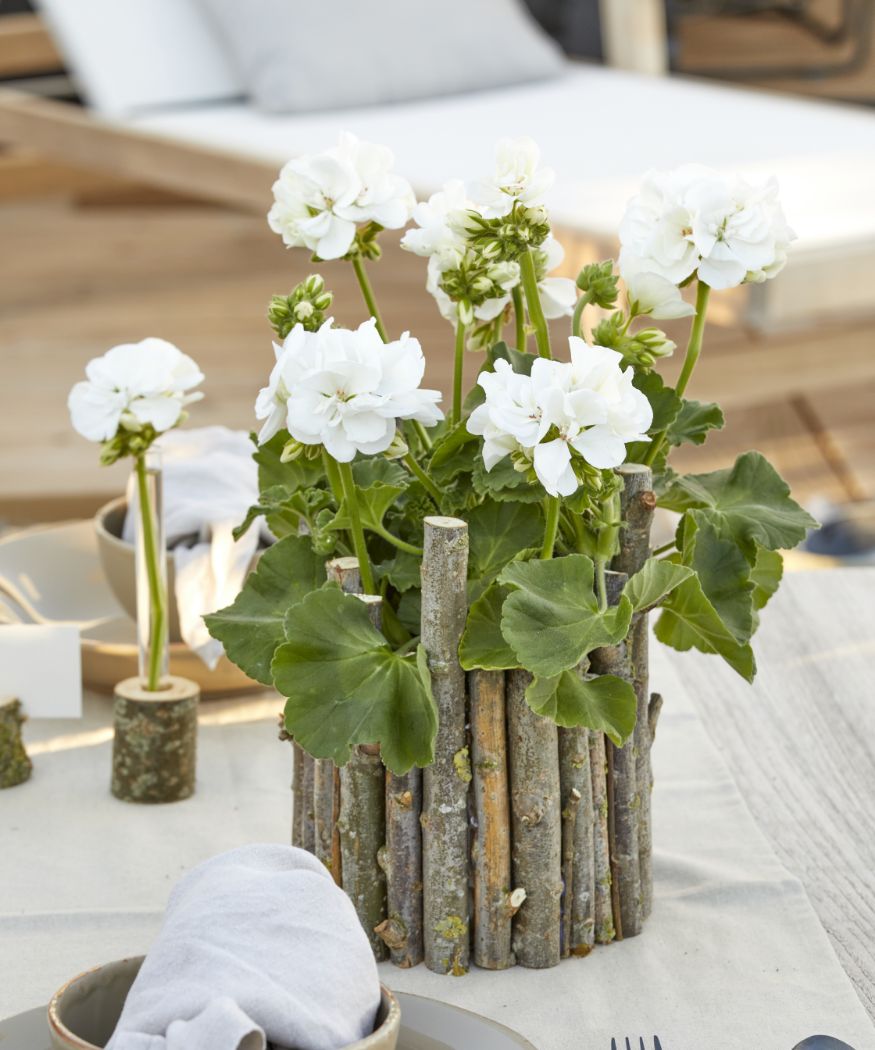
DIY idea 3: Geranium pot for fans of a rustic, natural look
Are you more of a rustic nature lover? Then how about this decorative geranium pot? All you need is an old pot, straight branches, a hot glue gun, hot glue and a saw.
This geranium pot is also quick and easy to make: cut the branches into pieces of different lengths (no shorter than the height of the pot) and glue them tightly together with hot glue on the pot until it is completely covered. The biggest challenge in this craft project is to choose the correct thickness of the branch pieces, so that the pot is completely covered.
Tip: When collecting branches, be aware that you are not allowed to help yourself freely everywhere. Most forest areas are privately owned. And even in public nature areas, the collection of branches and twigs is usually prohibited or at least strictly regulated. If you don’t want to take any risks, it’s best to use materials from your own garden or that of friends or acquaintances for your DIY projects 😊.
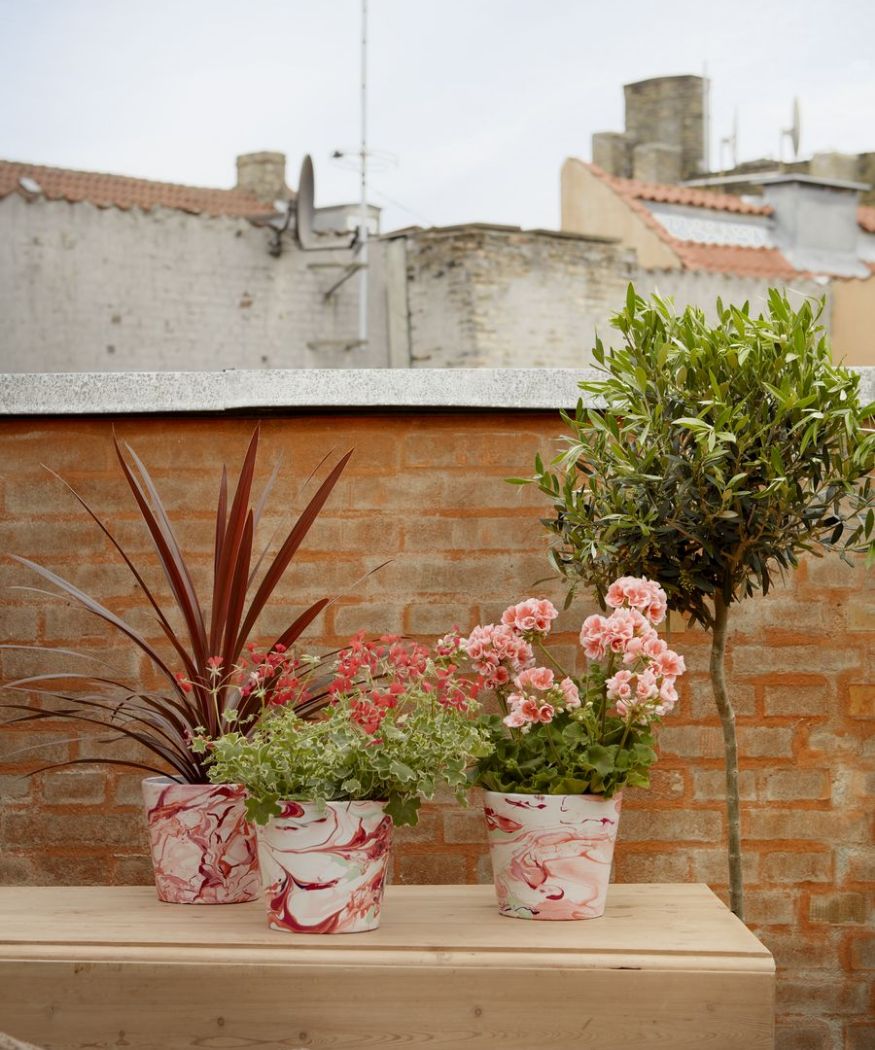
DIY idea 4: Geranium pot for beauty lovers
This DIY pot is ideal for you if you have access to a rich selection of nail polishes in different colours and enjoy being creative.
For this quick and easy DIY idea, you’ll need clean white pots, nail polish in different colours, wooden sticks for stirring and a large bowl or container filled with water.
Here’s how to do it: Pour water into a bowl, drop in nail polish in different colours and stir gently with the wooden stick to create an interesting pattern. Then pull the pot quickly through the water once, turning it until that the entire surface is wet. Let the pot drain and dry. Job done 😊!
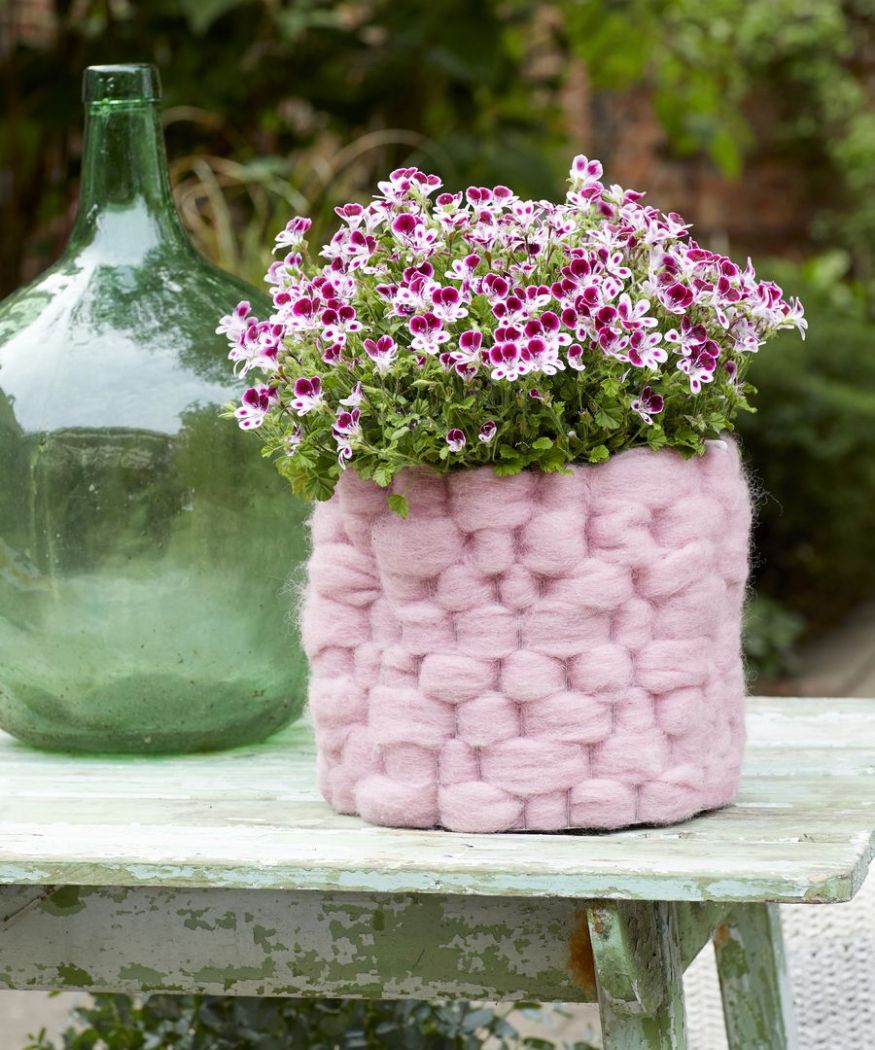
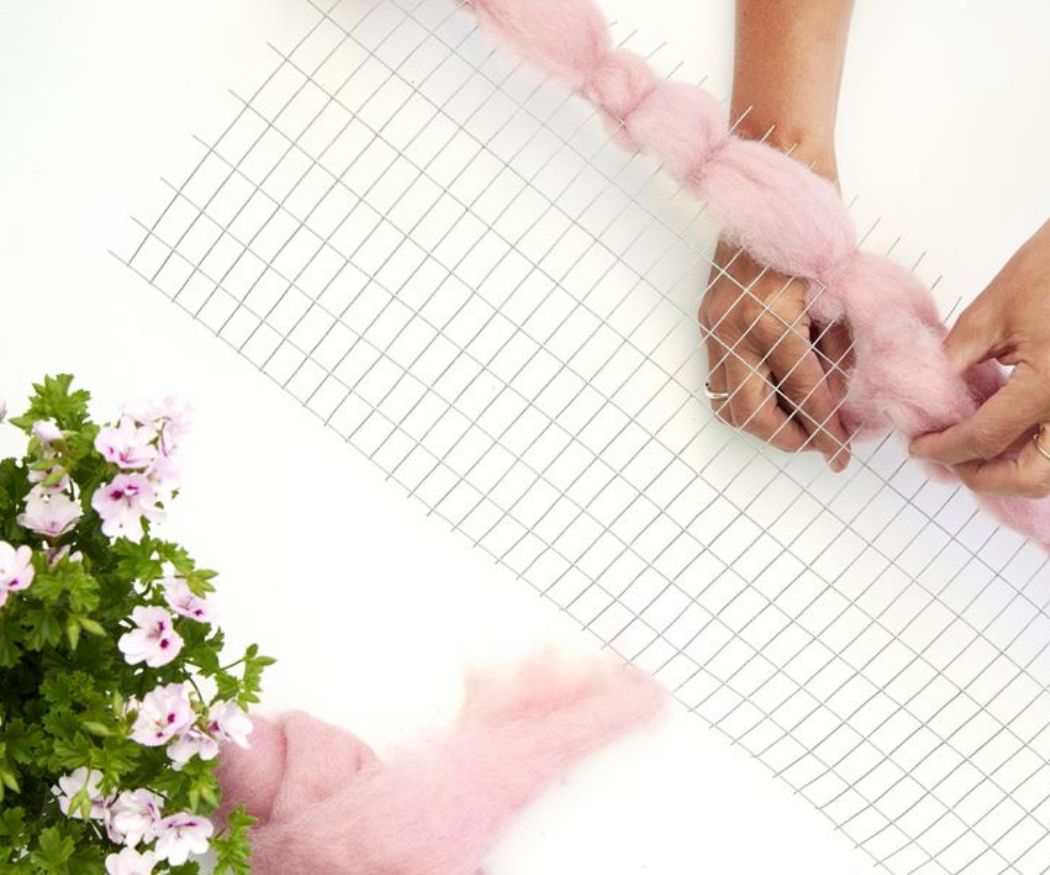
DIY idea 5: Geranium pot for craft lovers
Do you love needlework? Then you’re sure to love this wool pot arrangement. For this homemade woollen pot cover you will need a pot, felt wool, coarse wire mesh and scissors.
Here’s how to do it:
Lay the wire mesh loosely around the pot to find out the size you need and cut it to the right height and length. Then thread the wool through the wire mesh, one strand at a time. Feel free to vary the spacing to make the finished product look more interesting. Once the entire wire mesh is covered with wool, all you have to do is join the two ends of the mesh together and place the geranium and pot in the DIY cover.
DIY-Idee 6: Geranien-Topf für Boho-Fans
Diese farbenfrohen DIY-Töpfe im Boho-Stil kannst du im Nullkommanichts selbst gestalten. Besonders schnell geht es, wenn du als Basis farbige Kunststoff-Töpfe nimmst. Neben den Töpfen brauchst du Heißkleber, Pompon-Bändchen, Zackenlitze und anderen Zierborten und -bänder. Du musst nichts weiter tun, als die Töpfe nach Lust und Laune zu verzieren. Einfacher geht es nicht!
Statt auf farbige Kunststoff-Töpfe kannst du natürlich auch auf alte Terrakottatöpfe zurückgreifen, die du in deiner Wunschfarbe anmalst.
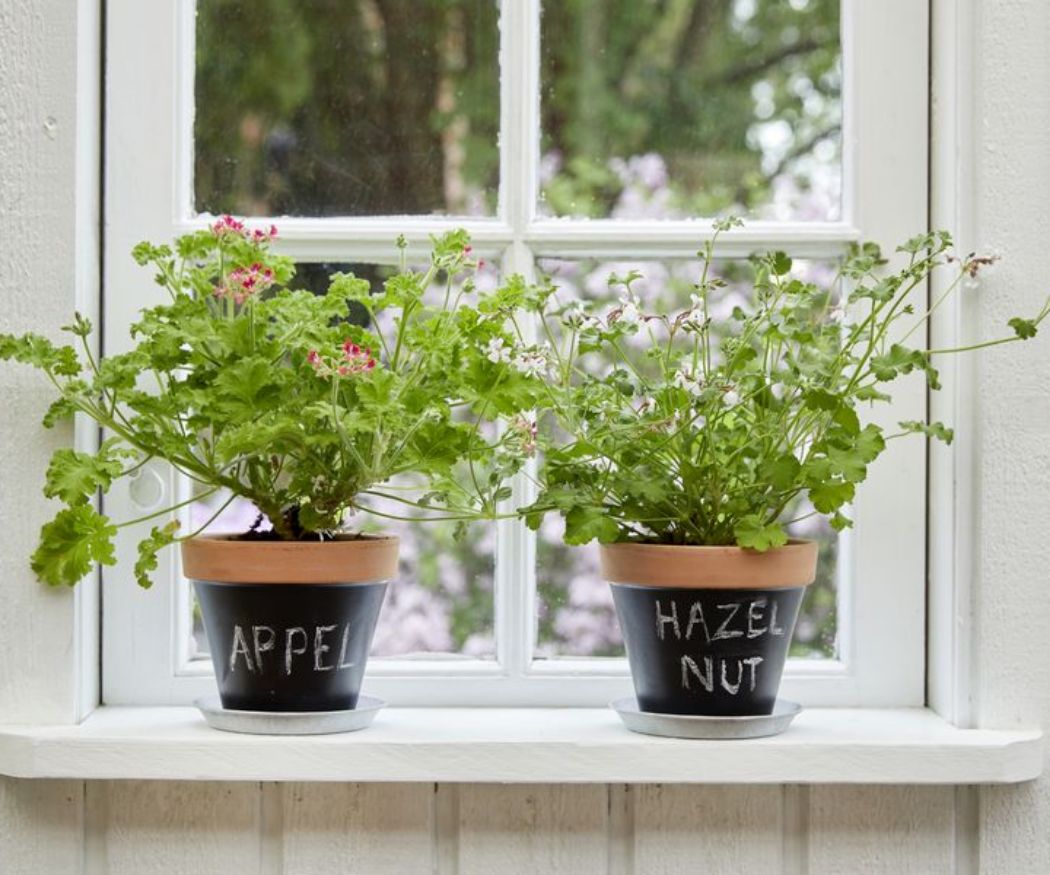
DIY-Idee 7: Geranien-Topf für Hobbyköche
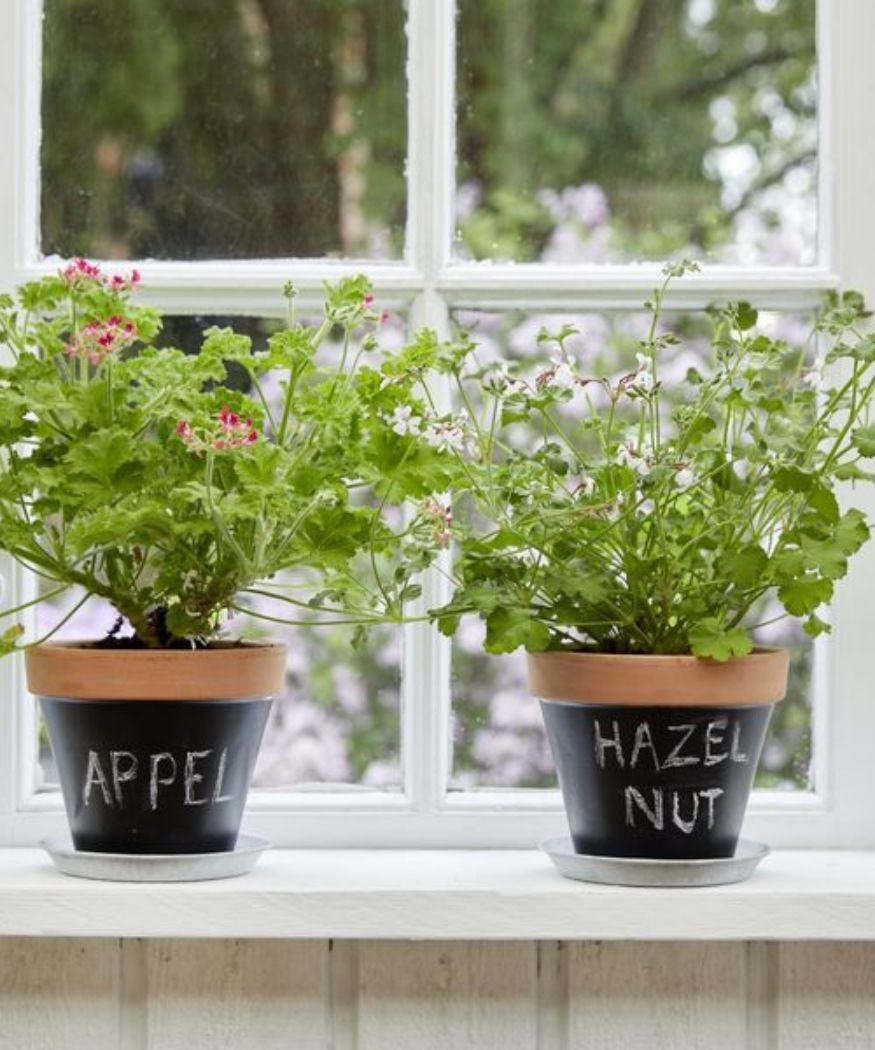
Do you love to cook, or would you like to give a gift to someone who loves to cook? Then this DIY scented geranium garden for the windowsill is a the perfect craft project for you. You will need various scented geraniums, terracotta pots, a paintbrush, adhesive tape, chalk and blackboard paint in the colours of your choice.
Here’s how to do it: Tape the top edges of the pots. Then paint them with blackboard paint and let them dry. Wait until the varnish has dried, remove the tape and write on the pots with chalk.